
Hanging wall art is easier than you think, especially when it’s pictures of your furry baby! Since you are an amazing pet parent, you most likely have plenty of pictures of your pet and have finally narrowed it down to your favorite 4 adorable photos. Now it’s time to navigate through the process of hanging the group of pictures. Here are five cute and simple layouts that will help you display your pet like royalty! Each layout is a creative idea for arranging your photos, offering decorating inspiration for your home. These decorating ideas will help you create an aesthetically pleasing display and avoid common mistakes when arranging your wall art.
Introduction to Creating a Gallery Wall
Creating a gallery wall is one of the easiest ways to bring personality and style into any room. Whether you’re working with a blank wall or looking to refresh a bare wall, a gallery wall lets you showcase your favorite art, family pictures, or treasured prints in a way that feels uniquely yours. The process of creating a gallery wall starts with choosing the right picture frames and deciding on the overall style you want to achieve, think modern, eclectic, or classic.
Before you start hanging, gather your favorite artwork and lay out your arrangement on the floor to experiment with different layouts. Using a picture hanging tool can make it much easier to hang your wall art evenly and keep everything level. Don’t be afraid to mix and match frame styles or include a variety of art pieces to create a look that reflects your taste. With a little planning and creativity, you’ll transform any room into a space that feels curated and inviting.
Horizontal Line
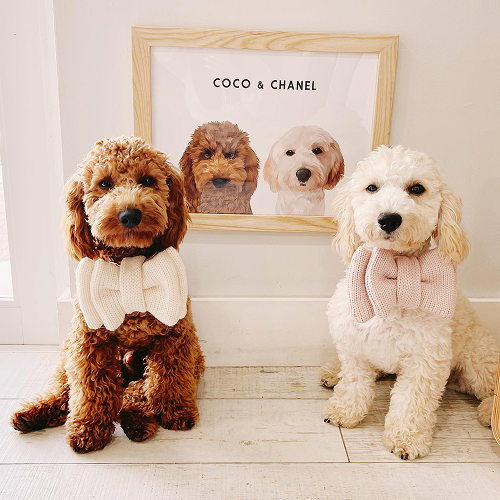
Hanging a group of pictures requires you to tap into your creative skills and decide on the look you want. Find a place on your wall to hang your pet portrait gallery. This space needs to be large enough to hold all four photo frames. A popular grouping is hanging four same-size photo frames side by side, like doors next to each other, across the same wall, creating a horizontal line. Make sure the edges of the frames are aligned to ensure a straight line, and keep the group centered on the wall for a balanced look. Consider the width of the arrangement in relation to your wall or furniture for the best effect. The goal is to hang wall art evenly across the wall for a polished appearance. For a more dramatic effect, try using larger pieces in your arrangement.
You can have extra fun and create an artistic look by using different colored and textured frames. For example, match your frames to the accent color in your home. You could also choose frames that have your dog’s names engraved on them to help tell them apart. These layout ideas are inspired by Pottery Barn and work well in various rooms, especially the living room.
Once the space on your wall is chosen, place the framed photos on the floor to decide which arrangement you prefer. Marking the wall where each frame will go is an important step to guide placement. When measuring, subtract half the height of the frame to determine the correct placement using the height formula. Measuring and marking are the most important steps to ensure the frames are aligned and evenly spaced. Be sure the distance between frames is measured for even spacing. If you notice any misalignment, you can easily fix it by adjusting the frames. A picture hanging hack is to use a level to keep everything straight.
Then, gather your tools such as a hammer, nails, and level for hanging artwork. You can choose alternatives for nails if you don’t want to puncture your walls. When you hang art, make sure to check that everything is straight and spaced properly. After you hang wall art, post a photo of your finished arrangement on social media and check out more posts for additional layout ideas.
The Perfect Square
You are probably asking how to hang a group of 4 pictures the same size. This is a popular option that creates a uniform and clean look which compliments any style of home décor. First look at the size of your wall and decide which size picture frame you need to accommodate the space.
If you have a large wall, avoid getting small frames, instead, get medium or large to fill the space. However, if you live in a small space you can choose either size depending on the overall look and feel of the room. Large frames grouped in four in a small space create an amazing focal point and help the space feel larger.
As mentioned earlier, arrange the frames on the floor beneath the wall first to ensure they create the look you vision. Then, get to work carefully measuring and pinpointing the exact amount of space needed to hang the pictures in that format as well as include the amount of space between each picture which usually ranges 1” to 2” inches.
The typical way to hang four pictures the same size is in a group of 4 with two pictures side by side and the other two beneath. The goal is to keep them in sync with the same amount of spacing between each one.
Scattered Look
The scattered look is a great decorating idea for those who want a more creative and personalized display. When hanging a group of pictures that are different sizes, consider these ideas for arranging your photos: create a large square or rectangle on the wall that fits the various sizes, or try a more freeform layout for different rooms like the living room. Arrange the photo frames on the floor until you find the right fit for the space, some frames might be taller, wider, or even larger pieces than others. Carefully arrange them to look visually pleasing, paying attention to the edges for a cohesive look.
Remember, you can use different frame colors as well. A popular decorating choice is using wood frames that are all different sizes and fitting them together like a puzzle, leaving a little space in between for a gallery wall effect. The different sizes draw attention to the area while the matching frames pull the look together.
As mentioned earlier, use tools such as a measuring tape, large ruler, nails, hammer, or nail alternatives to hang the pictures on the wall. The fun part about using different sized frames is they don’t need to look perfect and allow you to generate new ideas for hanging artwork that complements your home.
2 Large, 2 Small
A creative way to hang four pictures on a wall involves two larger pieces and two small frames. For example, choose two 8” x 10” frames and the other two 12” x 16” and arrange them to suit your wall space. When planning your layout, consider the width of the arrangement in relation to your wall or the furniture below. Ideally, the total width should be at least 2/3 the width of the furniture for a balanced look. Create an overall rectangular space on your wall that will hold all the frames. Place the two smaller frames one on top of the other in the center of the rectangle and place the two larger pieces on each side.
You can have a lot of fun with this sequence by placing a headshot of your dog in the larger frame, and action shots in the others. Or you can choose to put headshots in both the large frames with different poses and your pet playing with their toys in the other.
You can be even more creative by placing birthday pictures of your pet to show how they have grown over the past four years. Choosing the pictures is important to create an organized look. Try to choose portraits with the same brightness for a balanced visually appealing art wall.
Oval Frames
Oval frames are a unique type of photo frames that offer a distinctive way to display photos of your pets. They are available in a variety of sizes and frame styles. If your home décor is Victorian-themed, this decorating idea is an excellent way to incorporate your dog’s pictures into your home without it looking out of place.
Choose oval photo frames and pictures that will look great on your wall. The curved edges of these frames will appear authentic and coordinate with your overall Victorian theme, making them a stylish addition to any rooms, especially the living room.
Don’t forget you can use oval photo frames and incorporate them into any group of four. They come in a variety of shapes and decorative framing to ensure you create a unique look that is customized for your home.
Determining the Right Height
One of the most important steps in hanging wall art is figuring out the right height for your gallery wall. The general guideline is to position the center point of your artwork at about 57 to 60 inches from the floor, which is considered eye level for most people. This helps your art feel connected to the room and makes it easy to enjoy. However, you’ll want to adjust this height if you’re hanging pictures above a furniture piece, like a sofa or console table, aim for the bottom edge of the lowest frame to be 6 to 8 inches above the furniture.
To make sure your gallery wall is straight and perfectly aligned, use a laser level or a small level as you hang each piece. Take into account the height of your ceilings and the scale of your furniture to find the perfect spot. By focusing on the center point and keeping your artwork at eye level, you’ll create a balanced and harmonious look that enhances your room.
Deciding How Much Space to Leave Between Pictures
Spacing is key when you’re creating a gallery wall that looks polished and intentional. The amount of space you leave between each picture can dramatically affect the overall style and feel of your display. For most gallery walls, leaving about 2 to 3 inches of horizontal space between each picture frame works well, while 1 to 2 inches of vertical space keeps everything looking cohesive without feeling crowded.
To easily mark where each picture will go, use painter’s tape to outline your arrangement directly on the wall. This picture hanging hack lets you step back and double check your spacing before you commit to any nails or picture hangers. Adjust the tape as needed until you’re happy with the layout, then use a pencil mark to note the top or center mark for each frame. This method helps you create a gallery wall that feels balanced and makes the most of your wall space.
Hanging Heavy Pieces
If your gallery wall includes heavier art pieces or large picture frames, it’s important to hang them securely to avoid unnecessary holes or accidents. Start by choosing picture hangers or wall anchors that are rated for the weight of your artwork. Before you hammer in the first nail, use a pencil to mark the exact spot on the wall where you want to hang the piece. A small level will help you keep everything straight, especially for larger frames.
For extra peace of mind, consider using a picture hanging kit that includes a variety of hardware options. These kits often come with hooks, wires, and anchors designed to support heavier frames. Take your time to measure and double check your markings, this will help you avoid extra holes and ensure your artwork is hung safely and securely.
Using Wall Art to Enhance the Room
A well-designed gallery wall does more than just fill a blank wall, it brings your room to life and reflects your personal style. When selecting pictures and artwork, think about the colors, textures, and themes that will complement your existing decor. Mixing different frame styles, such as sleek black frames, classic white frames, or rustic wood frames, can add depth and interest to your display.
Consider the size and shape of your room, as well as how much natural light it gets, when choosing your art pieces. Don’t be afraid to combine family pictures, prints, and unique art pieces to create a gallery wall that tells your story. With thoughtful planning and a creative touch, your gallery wall will become a focal point that enhances the style and atmosphere of any room in your home.
Tips for Hanging Pictures on a Wall Like a Professional
1. Find out your wall type – Is your wall plasterboard, mortar, or brick? Find out exactly what your wall is made from and choose the right drill bit, anchor, and nail that are designed specifically for different types of walls. Protect mortar or plaster – Place a piece of masking tape on the wall where you plan to hammer or drill a nail. The tape protects the plaster from crumbling and prevents drilling a larger hole than needed.
2. Nails or alternatives – Are you concerned about nailing or drilling a hole in your walls? Use alternatives such as specially designed nails for pictures, mounting tape, invisible wall hooks, and other options found at your local home improvement store or online.
3. Protect your eyes – Hanging a picture on a wall doesn't sound dangerous but it can be if small pieces of plaster or dust go into your eyes. Use safety glasses or goggles to protect your eyes.
4. Measure and map out the right spot – If you have a difficult time hanging pictures, play it safe by measuring out the exact spots on the wall, including the space between each picture, and mark the wall. Use a level scale to ensure all four pictures are straight. You can also ask for help from a family member, friend or neighbor if you don't feel comfortable using a power drill or hammer.
5. Create an attractive display – Choose asymmetry or symmetry and make sure the frames are evenly spaced to create an organized and balanced art wall.
6. Hang pictures at eye level – You want to show off your cute pets, make sure they can be seen by hanging pictures at eye level to ensure a closer look. Avoid hanging frames too high on a wall.
7. Match the size of the wall with the group of pictures – Have you ever gone into someone's house that had a small tiny picture hanging on a large empty wall? It looks awkward and tiny. Make sure to use frame sizes that balance the space on your wall. Avoid using tiny or extra-large frames unless the specific wall suits the size.
8. Consider the frame type – You have your heart set on hanging four amazing pictures of your fur baby but don't forget the frames need to complement your décor. For example, if you have rustic décor, wood frames will coordinate well with your home décor, while shiny metal frames with diamonds will stick out like it doesn't belong. Make sure you choose frames that will add beauty to your home and create a positive environment.
Now that you have lots of tips for how to hang a group of 4 pictures, it's time to get to work! Start by choosing your favorite photos of your pets, then head over to West & Willow to create a custom art wall that displays your entire family-furry, or not!